Thursday, August 19, 2010

How to drop and recreate UNDO Tablespace in Oracle 9i/10g/11g

How to drop and recreate UNDO Tablespace in Oracle 9i/10g/11g?

Solution:

1. Determine the size of your undo tablespace

SQL> select sum(bytes)/1024/1024/1024 from dba_data_files where tablespace_name='UNDOTBS1';

SUM(BYTES)/1024/1024/1024
-------------------------
                12.09375
               
2. Create a new undo tablespace of the same size (larger or smaller) depending on your database requirements.
SQL> create undo tablespace UNDOTBS2 datafile 'D:\ORACLE\PRODUCT\10.2.0\ORADATA\ORCL2\UNDOTBS02.DBF' size 400M;

    Tablespace created.
   
3. Edit your init.ora file and change the parameter "undo_tablespace=UNDOTBS2" so it points to the newly created tablespace.
    Change undo_tablespace=UNDOTBS2
    Change undo_management=MANUAL

    Setting undo_management now ensures the old rollback segments can be taken offline and avoids editing the pfile and restarting the instance again in Step 7.
   
4. Arrange a time when the database can be shutdown cleanly and perform a shutdown immediate.   
5. Startup the database
6. Confirm the new tablespace is in use:

    SQL> show parameter undo_tablespace

    NAME                 TYPE              VALUE
    -------------        -----------       ------------
    undo_tablespace      string            UNDOTBS2
   
7. Check the status of the undo segments and determine if all the segments in the old undo tablespace are offline. The segments in the new tablespace may also show offline.
    SQL>select owner, segment_name, tablespace_name, status from dba_rollback_segs order by 3;

    OWNER         SEGMENT_NAME         TABLESPACE_NAME         STATUS
    ------              --------------------------- ------------------------------ -----------
    PUBLIC         _SYSSMU3$                      UNDOTBS1                         OFFLINE
    PUBLIC         _SYSSMU2$                      UNDOTBS1                         OFFLINE
    PUBLIC         _SYSSMU19$                     UNDOTBS2                         OFFLINE

    ....etc.

    If the old segments are online, then they must be taken offline:

    SQL>alter rollback segment "_SYSSMU3$" offline;
    SQL>alter rollback segment "_SYSSMU2$" offline;

    This should be executed for all online rollback segments in the old tablespace.

8. Provided all the segments in the old undo tablespace are offline, you can now drop the old undo tablespace:
    SQL>drop tablespace UNDOTBS1 including contents and datafiles;

    Tablespace dropped.

9. Edit your init.ora file do the following changes.

    undo_management='AUTO'
    undo_tablespace='UNDOTBS2'
   
10. Shutdown the database (shutdown immediate) and restart it.

11. Monitor the alert log simultaneously during all steps.

Reference Metalink Note: [ID 431652.1]

Monday, August 16, 2010

"Error Occurred While Attempting to Establish an Applications File Server Connection"

Error:

" An error occurred while attempting to establish an Applications File Server connection. There may be a network configuration problem, or the TNS listener may not be running on "
Solutions to Check

1. Is this a Multinode Install or a Single Node Install.
- If this is a Multinode Install, you will need access to the Middle Tier and the Backend Tier (Concurrent Processor) 8.0.6 ORACLE_HOME/network/admin/tnsnames.ora files

- If this is a Single Node Install, you need access to the Concurrent Processor 8.0.6 ORACLE_HOME/network/admin/tnsnames.ora file

2. Run a report, is there actually a Report Output and Log file being produced at the Operating System level?
- Check the $APPLCSF/out and the $APPLCSF/log directories for the Request_ID out and log file
- If there are no log and output file being produces there Check the permissions on those directories (APPLMGR should have write)
- If $APPLCSF is not set, check the $FND_TOP/log and out for output and logs

3. Confirm that there are 2 listener processes actively running for the Instance that you cannot view reports on -- 1 from 8.0.6 and from 8.1.6 directory structures
- type the following:
ps -ef | grep tnslsnr
- If there is only 1 listener running from the 8.1.6 directory structure
That is the Database Listener
The FNDFS listener needs to be started separately from the Database Listener
- To start the FNDFS Listener:
a. Log the Operating System Level as the APPLMGR account user
b. Set the environment for the $APPL_TOP & 8.0.6 $ORACLE_HOME (APPSORA.env)
c. Go to the $OAD_TOP/admin/scripts (Common_top area)
d. Run the following script:

adalnctl.sh start APPS_SID

(you can confirm the FNDFS Listener name from viewing the 8.0.6 ORACLE_HOME/network/admin/listener.ora file)

4. Check the actual machine name for the Concurrent Processor Server
- type the following:
uname -n

5. Go to the Applications and check the CONCURRENT > MANAGER > ADMINISTER screen in the System Administrator Responsibility The INTERNAL MANAGER NODE NAME; is it the same as what was returned from question 4?
- If it is the same then continue with next step
- If it is not the same,
Shutdown Concurrent Managers and update the FND table:
a. Go to the $OAD_TOP/admin/scripts
b. adcmctl.sh apps/apps stop
c. Connect to SQL*PLUS apps/apps

d. SQL > select target_node from FND_CONCURRENT_QUEUES;
--------------------
This may return the name of an old machine

e. SQL > update FND_CONCURRENT_QUEUES set target_node='' where target_node='';

f. SQL > commit;
g. SQL > exit
h. adcmctl.sh apps/apps start

6. In the 8.0.6 TNSNAMES.ora file, look at the FNDFS_ connection string entry.
Is the hostname value the same as is in questions 4?
- The Rapid Install creates 2 or sometimes 3 FNDFS entries in the TNSNAMES.ora
a. 1 with the FNDFS_
b. 1 with the FNDFS_
c. 1 with the FNDFS_
- The one that is the correct entry is FNDFS_ (hostname being what is returned from a "uname -n")
- If this file does not contain the correct Hostname value
Make a backup of it and edit it to change the FNDFS entry.

7. Check the Network Connection for the FNDFS entry that was defined by the Rapid Install.
- At the Operating System Level
a. tnsping FNDFS_
- This should return the Hostname name and Port information identical to the FNDFS entry in the TNSNAMES.ora file

8. Check the Following PROFILE > SYSTEM Options in The System Administrator Responsibility

CONCURRENT: Report Access Level (this must be set to USER or RESPONSIBILITY)
RRA: Service Prefix (this should be BLANK)
RRA: Enabled (this must be set to YES)
VIEWER: Text (this should be BLANK to view with the default text viewer)
- Viewer: Text can Be set to "browser" to view with Netscape or IE

9. This step should be performed in a case where there might have been patches applied and possibly the FNDFS executable was not Relinked, or it may be missing from the file system or corrupted.
- Shutdown the FNDFS Listener
a. $OAD_TOP/admin/scripts/adalnctl.sh stop APPS_SID
- Rename or Move the Current FNDFS executable before relinking
a. $FND_TOP/bin
mv FNDFS FNDFS.bak
b. As APPLMGR account user
adrelink.sh force=y "fnd FNDFS"
- Start the FNDFS Listener
a. $OAD_TOP/admin/scripts/adalnctl.sh start APPS_SID

Metalink Note : ID 117012.1

Thursday, March 11, 2010

Backup verification Statements/Steps

sqlplus "/as sysdba"

startup mount;

prompt The following should return zero rows

select count(*) from v$recover_file;
select count(*) from v$recovery_log;
select count(*) from v$recovery_status;
select count(*) from v$recovery_file_status;
select name,status from v$datafile where (name like '%MISS%' or status not in ('ONLINE', 'SYSTEM'))
/

select count(*) from v$backup where status != 'NOT ACTIVE' ;

col checkpoint_change# format 999999999999999

prompt The following should return one distinct number

Select distinct checkpoint_change# from v$datafile  ;

select distinct to_char(CHECKPOINT_TIME,'DD-MON-YYYY HH24:MI:SS') from v$datafile_header;

prompt This should return "0" and "8192" as output

select distinct fhsta from x$kcvfh;

Oracle Inventory Creationg/Attach/Dettach/Clone/Relink Code tree

1. Point the inventory to correct location

Make sure the file ./etc/oraInst.loc.,  ./var/opt/oracle/oraInst.loc. & $ORACLE_HOME/oraInst.loc. has the following entries.  If not modify the file and save.

inventory_loc=/oracle/product/oraInventory
inst_group=dba

2. Clone the code tree

+ cd $ORACLE_HOME/oui/bin
+ ./runInstaller -silent -clone -invPtrLoc $ORACLE_HOME/oraInst.loc -ignorePreReq  ORACLE_HOME=$ORACLE_HOME ORACLE_HOME_NAME=Ora10204_TEST ORACLE_HOST_NAME=test-01


!!! Please wait until the command is successful.  Do not interrupt.  !!!
Please check for .cloning is successful. message and will display message to run
.root.sh..  Sometime it may wait for you see this message.  Press .enter. to get
the .command prompt..

Run the following ,
+ cp /oracle/product/10.2.0.4//root.sh /oracle/product/10.2.0.4

+sudo /oracle/product/10.2.0.4//root.sh

Accept the default options for the prompts and location of the files.

3. Detach the code tree from oracle central inventory

+ cd $ORACLE_HOME/oui/bin
+./runInstaller -silent -detachHome -local -noClusterEnabled -invPtrLoc $ORACLE_HOME/oraInst.loc -ignorePreReq ORACLE_HOME=$ORACLE_HOME ORACLE_HOME_NAME=Ora10204_TEST


4. Attach the code tree to oracle central inventory . This will add correct host to the inventory

+ cd $ORACLE_HOME/oui/bin
+./runInstaller -silent -attachHome -local -noClusterEnabled -invPtrLoc $ORACLE_HOME/oraInst.loc -ignorePreReq ORACLE_HOME=$ORACLE_HOME ORACLE_HOME_NAME=Ora10204_TEST CLUSTER_NODES=test-01


5. Relink the code tree

find . -type l -exec ls -l {} \; | grep -i [oldsid] | awk '{print "rm -f "$9";ln -s "$11" "$9}' 
 execute the above command to check any softlinks are pointing to the old env. If yes then edit the output of the above command and run them.
Then,
oraenv   ( enter SID at the prompt ).  Check the above variables are set.
Make sure correct values are set for ORACLE_HOME, PATH & LD_LIBRARY_PATH
Make sure .SHLIB_PATH. variable is NOT set.
+ cd $ORACLE_HOME/bin
+ relink all

Tuesday, February 23, 2010

FAQs - How do we know how many users are connected to Oracle Applications.


FAQs - How do we know how many users are connected to Oracle Applications.

1. Enable Profile Option "Sign-On Audit" at "Form" level.
2. Run "Purge Signon Audit" request.
3. Security:Users -> Monitor" option
4  or with the below sql query  mentioned below.

select distinct fu.user_name User_Name,fr.RESPONSIBILITY_KEY Responsibility
from fnd_user fu, fnd_responsibility fr, icx_sessions ic
where fu.user_id = ic.user_id AND
fr.responsibility_id = ic.responsibility_id AND
ic.disabled_flag='N' AND
ic.responsibility_id is not null AND
ic.last_connect like sysdate;

5. Can use this SQL statement to count concurrent_users in Oracle apps:

select count(distinct d.user_name) from apps.fnd_logins a,
v$session b, v$process c, apps.fnd_user d
where b.paddr = c.addr
and a.pid=c.pid
and a.spid = b.process
and d.user_id = a.user_id
and (d.user_name = 'USER_NAME' OR 1=1)


DMT v/s LMT

Difference between Dictionary managed tablespace (DMT) and Locally managed tablespace (LMT)

Introduction:
The CREATE TABLESPACE command has a new clause introduced in Oracle8i, the "extent management clause", that specifies how the extents of the tablespace are managed. This clause uses one of the following parameters:

- DICTIONARY:
Specifies that the tablespace is managed using dictionary tables. This is the default in Oracle8i.

- LOCAL:
Specifies that tablespace is locally managed. This is the default in Oracle9i. Exception for the SYSTEM tablespace

Locally Managed Tablespaces:
A tablespace that manages its own extents maintains a bitmap in each datafile to keep track of the free or used status of blocks in that datafile. Each bit in the bitmap corresponds to a group of blocks. When an extent is allocated or freed for reuse, Oracle changes the bitmap values to show the new status of the blocks. These changes do not generate rollback information because they do not update tables (like sys.uet$, sys.fet$) in the data dictionary (except for special cases such as tablespace quota information).

When you create a locally managed tablespace, header bitmaps are created for each datafile. If more datafiles are added, new header bitmaps are created for each added file.

Local management of extents automatically tracks adjacent free space, eliminating the need to coalesce free extents. The sizes of extents that are managed locally can be determined automatically by the system. Alternatively, all extents can have the same size in a locally managed tablespace.

Dictionary Managed Tablespaces:
In DMT, to keep track of the free or used status of blocks, oracle uses data dictionry tables. When an extent is allocated or freed for reuse, free space is recorded in the SYS.FET$ table, and used space in the SYS.UET$ table. Whenever space is required in one of these tablespaces, the ST (space transaction) enqueue latch must be obtained to do inserts and deletes agianst these tables. As only one process can acquire the ST enque at a given time, this often lead to contention. These changes generate rollback information because they update tables (like sys.uet$, sys.fet$) in the data dictionary.

Advantages of Locally Managed Tablespaces(LMT) over Dictionary Managed Tablespaces(DMT):

1. Reduced recursive space management
2. Reduced contention on data dictionary tables
3. No rollback generated
4. No coalescing required

Converting DMT to LMT:

SQL> exec dbms_space_admin.Tablespace_Migrate_TO_Local('ts1');
PL/SQL procedure successfully completed.

Converting LMT to DMT:

SQL> exec dbms_space_admin.Tablespace_Migrate_FROM_Local('ts2');
PL/SQL procedure successfully completed.

Important Points:
1. LMTs can be created as
a) AUTOALLOCATE: specifies that the tablespace is system managed. Users cannot specify an extent size.
b) UNIFORM: specifies that the tablespace is managed with uniform extents of SIZE bytes. The default SIZE is 1 megabyte.
2. One cannot create a locally managed SYSTEM tablespace in 8i.
3. This is possible with in 9.2.0.X, where SYSTEM tablespace is created by DBCA as locally managed by default. With a locally managed SYSTEM tablespace, the rest of the tablespaces in such database

have to be locally managed as well.
4. Locally managed temporary tablespaces can not be of type "permanent".


Source : dbapool.com

Tuesday, January 26, 2010

ORACLE RAC ON/RAC OFF

Oracle's RAC: ON and OFF

In some cases, you may want to disable the RAC options for testing purposes -- perhaps to run a benchmark or convert the RAC binaries to single instance binaries. In such a case, you can use the following procedure to convert the RAC installation to non-RAC. Disabling and enabling RAC options are available only for UNIX platforms. Windows installations do not support relinking binaries with RAC ON and OFF.

Use the following steps to disable RAC (known as RAC OFF):


1. Log in as the Oracle software owner (which is typically the UNIX account oracle) in all nodes.
2. Shut down all the instances from all the nodes using a NORMAL or IMMEDIATE option.
3. Change the working directory to $ORACLE_HOME/rdbms/lib: cd $ORACLE_HOME/rdbms/lib
4. Run the following make command to relink the Oracle binaries without the RAC option: make -f ins_rdbms.mk rac_off

This normally runs for few minutes and should not pose any errors.
5. . Now relink the Oracle binaries: make -f ins_rdbms.mk ioracle

Now the Oracle binaries are relinked with the RAC OFF option. You may have to edit the init.ora or SPFILE parameters accordingly. If errors occur in step 4, you may need to contact Oracle Support and log a service request with the trace and log files.

Use the following steps to enable RAC (known as RAC ON):

1. Log in as the Oracle software owner (typically the UNIX account oracle) in all nodes.
2. Shut down all the instances from all the nodes using a NORMAL or IMMEDIATE option.
3. Change the working directory to $ORACLE_HOME/rdbms/lib:
4. cd $ORACLE_HOME/rdbms/lib Run the following make command to relink the Oracle binaries without the RAC option:
make -f ins_rdbms.mk rac_on

This normally runs for a few minutes and should not pose any errors.
5. Now relink the Oracle binaries:
make -f ins_rdbms.mk ioracle

Now the Oracle binaries are relinked with the RAC ON option. You may need to edit the init.ora or SPFILE parameters accordingly. If any errors occur in step 4, you may need to contact Oracle Support and log a service request with the trace and log files.

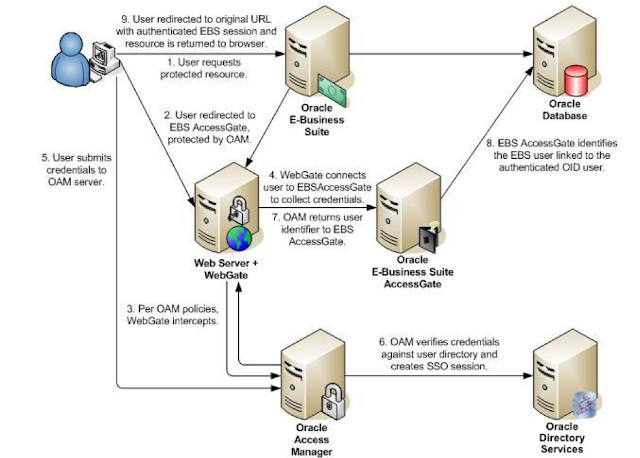
Oracle EBS integration with Oracle IDCS for SSO

Oracle EBS integration with Oracle IDCS for SSO Oracle EBS SSO? Why is it so important? Oracle E-Business Suite is a widely used application...