Monday, May 23, 2011

Where are the log files located in R12?

Where are the log files located in R12?

For DBA’s who mostly worked on 11i environments, finding the log files (Concurrent manager log, apache log etc.,) on a R12 environment might pose a threat initially, because these log files no longer reside in their old location ie., $APPLCSF/$APPLLOG or $APACHE_TOP/Apache/logs.
In R12, the log files are located in $LOG_HOME (which translates to $INST_TOP/logs)
Concurrent Reqeust related logs
$LOG_HOME/appl/conc -> location for concurrent requests log and out files
$LOG_HOME/appl/admin -> location for mid tier startup scripts log files
Apache Logs (10.1.3 Oracle Home which is equivalent to iAS Oracle Home)
$LOG_HOME/ora/10.1.3/Apache -> Location for Apache Error and Access log files
$LOG_HOME/ora/10.1.3/j2ee -> location for j2ee related log files
$LOG_HOME/ora/10.1.3/opmn -> location for opmn related log files
Forms & Reports related logs (10.1.2 Oracle home which is equivalent to 806 Oracle Home)
$LOG_HOME/ora/10.1.2/forms
$LOG_HOME/ora/10.1.2/reports
Related metalink notes to enable additional debugging
419839.1 – How to enable Apache, OC4J and OPMN logging in Oracle Applications R12
422419.1 – R12 – How To Enable and Collect Debug for HTTP, OC4J and OPMN

Source : http://oraclepitstop.wordpress.com

Friday, April 29, 2011

How to enable Apache and Jserv Debugging in Oracle Apps 11i?

PURPOSE:-If a user experiences an error, request a screen shot of the error and any further error details that they can report.If the error is reproducible, enable the following middle tier debug settings and collect diagnostic information appropriately and upload to support for troubleshooting.

Looking for Jserv.log at $IAS_ORACLE_HOME/Apache/Jserv/logs then enable…
For Temporary purpose manually editing configuration files.
1) Shut Down Apache Server
2) Backup the existing files in the following files:
$IAS_ORACLE_HOME/Apache/Apache/logs
$IAS_ORACLE_HOME/Apache/Jserv/logs
$IAS_ORACLE_HOME/Apache/Jserv/logs/jvm
3) Enable debug logging for Apache
s_apache_loglevel=debug (In Context File)
Or
loglevel debug (In $IAS_ORACLE_HOME/Apache/Apache/conf/httpd.conf)
4) Enable debug logging for mod_jserv
s_apjservloglevel=debug (In Context File)
Or
ApJServLogLevel debug (In $IAS_ORACLE_HOME/Apache/Jserv/etc/jserv.conf)
5) Enable debug logging for Jserv
s_oacorelog=true (In Context File)
Or
log=true log.channel=true log.channel.info=true log.channel.debug=true
(In $IAS_ORACLE_HOME/Apache/Jserv/etc/jserv.properties)
6) Enable debug logging for Forms Listener Servlet JVM. (Optional)
s_oaformslog=true (In Context File)
Or
log=true log.channel=true log.channel.info=true log.channel.debug=true
(In $IAS_ORACLE_HOME/Apache/Jserv/etc/forms.properties)
7) Restart Apache
(If Context File had been edited in above steps then run autoconfig to update the configuration files.) 8) Replicate the Problem.
9) Review the following files from the $IAS_ORACLE_HOME/Apache/Jserv/logs directory
a) mod_jserv.log
b) jserv.log
c) All files from the $IAS_ORACLE_HOME/Apache/Jserv/logs/jvm directory These will
have filenames of the form jvm.jvm.stdoutstderr For example,
OACoreGroup.0.stderr
d) $COMMON_TOP/rgf/instance_hostname/javacache.log

Source: http://leenus2b.wordpress.com

For R12: How To : How to enable Apache, OC4J and OPMN logging in Oracle Applications R12  use Doc id [ID 419839.1]

Wednesday, March 02, 2011

Forms Servlet mode to Socket mode conversion on Release 12 Apps

How to convert Forms server to Socket mode  from Servlet mode in Oracle Apps R12

Run the following command to enable Forms Socket Mode on Forms/web nodes (Place correct context file name and port value)

$FND_TOP/bin/txkrun.pl -script=ChangeFormsMode -contextfile=$CONTEXT_FILE -mode=socket  -port=9030 -runautoconfig=No


Where port = forms port and contextfile=your environment contextfile

To Start/Stop/check Status of forms servers use following scripts

cd $ADMIN_SCRIPTS_HOME
./adformsrvctl.sh status/stop/start


Friday, October 29, 2010

MSG-00102: Error Message :ORA-20100: File o0000071.tmp creation for FND_FILE failed.

Troubleshooting Details

If a PL/SQL Concurrent Program can't write to an external file, you will receive an error message similar to:

MSG-00102: Error Message :ORA-20100: File o0000071.tmp creation for FND_FILE failed.
You will find more information on the cause of the error in request log.
ORA-06512: at "APPS.FND_FILE", line 378
ORA-06512: at "APPS.FND_FILE", line 473
ORA-06512: at "APPS.AP_TRIAL_BALANCE_PKG", line 192
REP-1419: 'beforereport': PL/SQL program aborted.

NOTE: Applications also produces temporary PL/SQL output files used in concurrent processing. These files are written to a location on the database server node specified by the APPLPTMP environment setting. The APPLPTMP directory must be the same directory as specified by the utl_file_dir parameter in your database initialization file.
.
Rapid Install sets both APPLPTMP and the utl_file_dir parameter to the same default directory. As the temporary files placed in this directory may contain context sensitive information, it should be a secure directory on the database server node with read and write access for the database server owner. In a multi-node system, the directory defined by APPLPTMP does not need to exist on the application tier servers. During an upgrade with AutoUpgrade, you must provide the utl_file_dir parameter value for the APPLPTMP environment setting.


To isolate where the problem is, verify the following:

1) Make sure that the name of the file is valid (the file name should not include characters like "^")

2) Make sure that APPLPTMP is set to a valid directory and that BOTH the applmgr user and the database user have read and write permissions on that directory (normally, it can be set to the same directory as APPLTMP)

3) Make sure that the file does not exit on the directory pointed by APPLPTMP

4) Make sure the directory pointed by APPLPTMP is the first entry on the utl_file_dir. Also, verify that all the entries on the utl_file_dir are valid and that the applmgr has read/write permissions.

If using an spfile, verify the proper syntax to set utl_file_dir:

Eg:  ALTER SYSTEM SET UTL_FILE_DIR='directory1','directory2' scope=spfile;

5) If still having problems, check if you can write a file directly using FND_FILE, which is the package used by the Application. From sqlplus, connected as the apps user, run:

    SQL> exec FND_FILE.PUT_LINE(FND_FILE.LOG, 'THIS IS A TEST');

This should dump a file on APPLPTMP.

If this test works, it would indicate that FND_FILE is ok and the problem is possibly with the Application.

You may want to leave only one entry on utl_file_dir for this test.

6) If still having problems, check if you can write a file using UTL_FILE, which is used by FND_FILE.

Run the PL/SQL below, changing to the first entry on utl_file_dir (you may want to leave just one entry on utl_file_dir for this test).

set serveroutput on
DECLARE
  file_location VARCHAR2(256) := '';
  file_name VARCHAR2(256) := 'utlfile1.lst';
  file_text VARCHAR2(256) := 'THIS IS A TEST';
  file_id UTL_FILE.file_type;
BEGIN
  file_id := UTL_FILE.fopen(file_Location, file_name, 'W');
  UTL_FILE.put_line(file_id, file_text);
  UTL_FILE.fclose(file_id);
EXCEPTION
  WHEN UTL_FILE.INVALID_PATH
  THEN dbms_output.put_line('Invalid path ' || SQLERRM);
    WHEN OTHERS
  THEN dbms_output.put_line('Others '|| SQLCODE || ' ' || SQLERRM);
END;
/

This program should dump a file on the requested directory. If the test fails, the problem is probably on the Database side.

If it works, the problem is probably on FND_FILE. In this scenario, check the versions of AFCPPIOS.pls and AFCPPIOB.pls.


Source : Troubleshooting ORA-20100 on Concurrent Processing [ID 261693.1] (suppot.oracle.com)

Thursday, August 19, 2010

How to drop and recreate TEMP Tablespace in Oracle 9i/10g/11g

How to drop and recreate TEMP Tablespace in Oracle 9i/10g/11g

1. Create Temporary Tablespace Temp

CREATE TEMPORARY TABLESPACE TEMP2 TEMPFILE  ‘/u01/app/oradata/temp01′ SIZE 2000M, ‘/u01/app/oradata/temp02′ SIZE 2000M';

2. Move Default Database temp tablespace

ALTER DATABASE DEFAULT TEMPORARY TABLESPACE temp2;

3. Make sure No sessions are using your Old Temp tablespace

   a.  Find Session Number from V$SORT_USAGE:
       SELECT USERNAME, SESSION_NUM, SESSION_ADDR FROM V$SORT_USAGE;

   b.  Find Session ID from V$SESSION:

       If the resultset contains any tows then your next step will be to find the SID from the V$SESSION view. You can find session id by using SESSION_NUM or SESSION_ADDR from previous resultset.

       SELECT SID, SERIAL#, STATUS FROM V$SESSION WHERE SERIAL#=SESSION_NUM;
       OR
       SELECT SID, SERIAL#, STATUS FROM V$SESSION WHERE SADDR=SESSION_ADDR;

    c.  Kill Session:

    Now kill the session with IMMEDIATE.

    ALTER SYSTEM KILL 'SID,SERIAL#' IMMEDIATE;

4. Drop temp tablespace

DROP TABLESPACE temp INCLUDING CONTENTS AND DATAFILES;

5. Recreate Tablespace Temp

CREATE TEMPORARY TABLESPACE TEMP TEMPFILE /u01/app/temp/temp01′ SIZE 2000M;

6 Move Tablespace Temp, back to new temp tablespace

ALTER DATABASE DEFAULT TEMPORARY TABLESPACE temp;

7. Drop temporary for tablespace temp

DROP TABLESPACE temp2 INCLUDING CONTENTS AND DATAFILES;

 No need to do shutdown when drop temp tablespace and the recreate it. If something happen with temp tablespaces e.g. : crash, corrupt, etc. Oracle database will ignore the error, but DML (insert,update,delete) and SELECT Query will suffer.

How to drop and recreate UNDO Tablespace in Oracle 9i/10g/11g

How to drop and recreate UNDO Tablespace in Oracle 9i/10g/11g?

Solution:

1. Determine the size of your undo tablespace

SQL> select sum(bytes)/1024/1024/1024 from dba_data_files where tablespace_name='UNDOTBS1';

SUM(BYTES)/1024/1024/1024
-------------------------
                12.09375
               
2. Create a new undo tablespace of the same size (larger or smaller) depending on your database requirements.
SQL> create undo tablespace UNDOTBS2 datafile 'D:\ORACLE\PRODUCT\10.2.0\ORADATA\ORCL2\UNDOTBS02.DBF' size 400M;

    Tablespace created.
   
3. Edit your init.ora file and change the parameter "undo_tablespace=UNDOTBS2" so it points to the newly created tablespace.
    Change undo_tablespace=UNDOTBS2
    Change undo_management=MANUAL

    Setting undo_management now ensures the old rollback segments can be taken offline and avoids editing the pfile and restarting the instance again in Step 7.
   
4. Arrange a time when the database can be shutdown cleanly and perform a shutdown immediate.   
5. Startup the database
6. Confirm the new tablespace is in use:

    SQL> show parameter undo_tablespace

    NAME                 TYPE              VALUE
    -------------        -----------       ------------
    undo_tablespace      string            UNDOTBS2
   
7. Check the status of the undo segments and determine if all the segments in the old undo tablespace are offline. The segments in the new tablespace may also show offline.
    SQL>select owner, segment_name, tablespace_name, status from dba_rollback_segs order by 3;

    OWNER         SEGMENT_NAME         TABLESPACE_NAME         STATUS
    ------              --------------------------- ------------------------------ -----------
    PUBLIC         _SYSSMU3$                      UNDOTBS1                         OFFLINE
    PUBLIC         _SYSSMU2$                      UNDOTBS1                         OFFLINE
    PUBLIC         _SYSSMU19$                     UNDOTBS2                         OFFLINE

    ....etc.

    If the old segments are online, then they must be taken offline:

    SQL>alter rollback segment "_SYSSMU3$" offline;
    SQL>alter rollback segment "_SYSSMU2$" offline;

    This should be executed for all online rollback segments in the old tablespace.

8. Provided all the segments in the old undo tablespace are offline, you can now drop the old undo tablespace:
    SQL>drop tablespace UNDOTBS1 including contents and datafiles;

    Tablespace dropped.

9. Edit your init.ora file do the following changes.

    undo_management='AUTO'
    undo_tablespace='UNDOTBS2'
   
10. Shutdown the database (shutdown immediate) and restart it.

11. Monitor the alert log simultaneously during all steps.

Reference Metalink Note: [ID 431652.1]

Monday, August 16, 2010

"Error Occurred While Attempting to Establish an Applications File Server Connection"

Error:

" An error occurred while attempting to establish an Applications File Server connection. There may be a network configuration problem, or the TNS listener may not be running on "
Solutions to Check

1. Is this a Multinode Install or a Single Node Install.
- If this is a Multinode Install, you will need access to the Middle Tier and the Backend Tier (Concurrent Processor) 8.0.6 ORACLE_HOME/network/admin/tnsnames.ora files

- If this is a Single Node Install, you need access to the Concurrent Processor 8.0.6 ORACLE_HOME/network/admin/tnsnames.ora file

2. Run a report, is there actually a Report Output and Log file being produced at the Operating System level?
- Check the $APPLCSF/out and the $APPLCSF/log directories for the Request_ID out and log file
- If there are no log and output file being produces there Check the permissions on those directories (APPLMGR should have write)
- If $APPLCSF is not set, check the $FND_TOP/log and out for output and logs

3. Confirm that there are 2 listener processes actively running for the Instance that you cannot view reports on -- 1 from 8.0.6 and from 8.1.6 directory structures
- type the following:
ps -ef | grep tnslsnr
- If there is only 1 listener running from the 8.1.6 directory structure
That is the Database Listener
The FNDFS listener needs to be started separately from the Database Listener
- To start the FNDFS Listener:
a. Log the Operating System Level as the APPLMGR account user
b. Set the environment for the $APPL_TOP & 8.0.6 $ORACLE_HOME (APPSORA.env)
c. Go to the $OAD_TOP/admin/scripts (Common_top area)
d. Run the following script:

adalnctl.sh start APPS_SID

(you can confirm the FNDFS Listener name from viewing the 8.0.6 ORACLE_HOME/network/admin/listener.ora file)

4. Check the actual machine name for the Concurrent Processor Server
- type the following:
uname -n

5. Go to the Applications and check the CONCURRENT > MANAGER > ADMINISTER screen in the System Administrator Responsibility The INTERNAL MANAGER NODE NAME; is it the same as what was returned from question 4?
- If it is the same then continue with next step
- If it is not the same,
Shutdown Concurrent Managers and update the FND table:
a. Go to the $OAD_TOP/admin/scripts
b. adcmctl.sh apps/apps stop
c. Connect to SQL*PLUS apps/apps

d. SQL > select target_node from FND_CONCURRENT_QUEUES;
--------------------
This may return the name of an old machine

e. SQL > update FND_CONCURRENT_QUEUES set target_node='' where target_node='';

f. SQL > commit;
g. SQL > exit
h. adcmctl.sh apps/apps start

6. In the 8.0.6 TNSNAMES.ora file, look at the FNDFS_ connection string entry.
Is the hostname value the same as is in questions 4?
- The Rapid Install creates 2 or sometimes 3 FNDFS entries in the TNSNAMES.ora
a. 1 with the FNDFS_
b. 1 with the FNDFS_
c. 1 with the FNDFS_
- The one that is the correct entry is FNDFS_ (hostname being what is returned from a "uname -n")
- If this file does not contain the correct Hostname value
Make a backup of it and edit it to change the FNDFS entry.

7. Check the Network Connection for the FNDFS entry that was defined by the Rapid Install.
- At the Operating System Level
a. tnsping FNDFS_
- This should return the Hostname name and Port information identical to the FNDFS entry in the TNSNAMES.ora file

8. Check the Following PROFILE > SYSTEM Options in The System Administrator Responsibility

CONCURRENT: Report Access Level (this must be set to USER or RESPONSIBILITY)
RRA: Service Prefix (this should be BLANK)
RRA: Enabled (this must be set to YES)
VIEWER: Text (this should be BLANK to view with the default text viewer)
- Viewer: Text can Be set to "browser" to view with Netscape or IE

9. This step should be performed in a case where there might have been patches applied and possibly the FNDFS executable was not Relinked, or it may be missing from the file system or corrupted.
- Shutdown the FNDFS Listener
a. $OAD_TOP/admin/scripts/adalnctl.sh stop APPS_SID
- Rename or Move the Current FNDFS executable before relinking
a. $FND_TOP/bin
mv FNDFS FNDFS.bak
b. As APPLMGR account user
adrelink.sh force=y "fnd FNDFS"
- Start the FNDFS Listener
a. $OAD_TOP/admin/scripts/adalnctl.sh start APPS_SID

Metalink Note : ID 117012.1

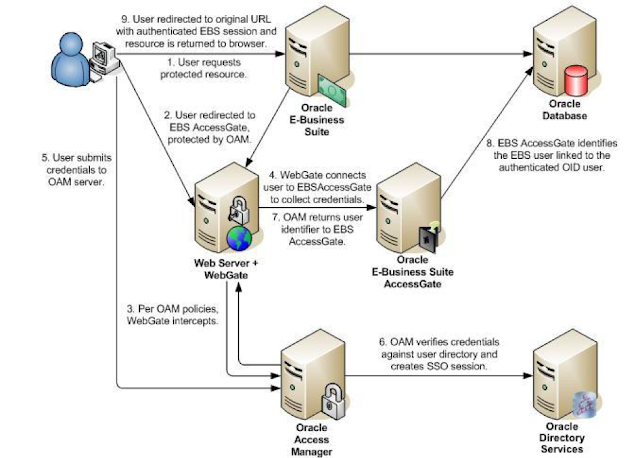
Oracle EBS integration with Oracle IDCS for SSO

Oracle EBS integration with Oracle IDCS for SSO Oracle EBS SSO? Why is it so important? Oracle E-Business Suite is a widely used application...