Sunday, January 22, 2012

ASM (Automatic Storage Management)

ASM (Automatic Storage Management)

In summary ASM provides the following functionality:

1. Manages groups of disks, called disk groups.
2. Manages disk redundancy within a disk group.
3. Provides near-optimal I/O balancing without any manual tuning.
4. Enables management of database objects without specifying mount points and filenames.
5. Supports large files.

Initialization Parameters and ASM Instance Creation

The initialization parameters that are of specific interest for an ASM instance are:

1. INSTANCE_TYPE - Set to ASM or RDBMS depending on the instance type. The default is RDBMS.
2. DB_UNIQUE_NAME - Specifies a globally unique name for the database. This defaults to +ASM but must be altered if you intend to run multiple ASM instances.
3. ASM_POWER_LIMIT -The maximum power for a rebalancing operation on an ASM instance. The valid values range from 1 to 11, with 1 being the default. The higher the limit the more resources are allocated resulting in faster rebalancing operations. This value is also used as the default when  the POWER clause is omitted from a rebalance operation.
4. ASM_DISKGROUPS - The list of disk groups that should be mounted by an ASM instance during instance startup, or by the ALTER DISKGROUP ALL MOUNT statement. 
5. ASM configuration changes are automatically reflected in this parameter.
6. ASM_DISKSTRING - Specifies a value that can be used to limit the disks considered for discovery. Altering the default value may improve the speed of disk  group mount time and the speed of adding a disk to a disk group. Changing the parameter to a value which prevents the discovery of                          already mounted disks results in an error. The default value is NULL allowing all suitable disks to be considered.

Startup and Shutdown of ASM Instances

ASM instance are started and stopped in a similar way to normal database instances. The options for the STARTUP commands are:

FORCE - Performs a SHUTDOWN ABORT before restarting the ASM instance.
MOUNT - Starts the ASM instance and mounts the disk groups specified by the ASM_DISKGROUPS parameter.
NOMOUNT - Starts the ASM instance without mounting any disk groups.
OPEN - This is not a valid option for an ASM instance.
The options for the SHUTDOWN command are:

NORMAL - The ASM instance waits for all connected ASM instances and SQL sessions to exit then shuts down.
IMMEDIATE - The ASM instance waits for any SQL transactions to complete then shuts down. It doesn't wait for sessions to exit.
TRANSACTIONAL - Same as IMMEDIATE.
ABORT - The ASM instance shuts down instantly.
Disks

Disk groups are created using the CREATE DISKGROUP statement. This statement allows you to specify the level of redundancy:

1. NORMAL REDUNDANCY - Two-way mirroring, requiring two failure groups.
2. HIGH REDUNDANCY - Three-way mirroring, requiring three failure groups.
3. EXTERNAL REDUNDANCY - No mirroring for disks that are already protected using hardware mirroring or RAID. If you have hardware RAID it should be used in preference to ASM redundancy, so this will be the standard option for most installations.

Disk group creation

CREATE DISKGROUP disk_group_1 NORMAL REDUNDANCY
  FAILGROUP failure_group_1 DISK
    '/devices/diska1' NAME diska1,
    '/devices/diska2' NAME diska2
  FAILGROUP failure_group_2 DISK
    '/devices/diskb1' NAME diskb1,
    '/devices/diskb2' NAME diskb2;

Drop Disk group

DROP DISKGROUP disk_group_1 INCLUDING CONTENTS;

Add Disks to disk group

ALTER DISKGROUP disk_group_1 ADD DISK
  '/devices/disk*3',
  '/devices/disk*4';

Delete Disks from Disk group

ALTER DISKGROUP disk_group_1 DROP DISK diska2;

Resize Disks

-- Resize a specific disk.
ALTER DISKGROUP disk_group_1
  RESIZE DISK diska1 SIZE 100G;

-- Resize all disks in a failure group.
ALTER DISKGROUP disk_group_1
  RESIZE DISKS IN FAILGROUP failure_group_1 SIZE 100G;

-- Resize all disks in a disk group.
ALTER DISKGROUP disk_group_1
  RESIZE ALL SIZE 100G;

Undrop diskgroup

ALTER DISKGROUP disk_group_1 UNDROP DISKS;

Rebalancing Diskgroup

ALTER DISKGROUP disk_group_1 REBALANCE POWER 5;

Disk group mount/unmount

ALTER DISKGROUP ALL DISMOUNT;
ALTER DISKGROUP ALL MOUNT;
ALTER DISKGROUP disk_group_1 DISMOUNT;
ALTER DISKGROUP disk_group_1 MOUNT;

Directories

-- Create a directory.
ALTER DISKGROUP disk_group_1 ADD DIRECTORY '+disk_group_1/my_dir';

-- Rename a directory.
ALTER DISKGROUP disk_group_1 RENAME DIRECTORY '+disk_group_1/my_dir' TO '+disk_group_1/my_dir_2';

-- Delete a directory and all its contents.
ALTER DISKGROUP disk_group_1 DROP DIRECTORY '+disk_group_1/my_dir_2' FORCE;

Aliases

-- Create an alias using the fully qualified filename.
ALTER DISKGROUP disk_group_1 ADD ALIAS '+disk_group_1/my_dir/my_file.dbf'
  FOR '+disk_group_1/mydb/datafile/my_ts.342.3';

-- Create an alias using the numeric form filename.
ALTER DISKGROUP disk_group_1 ADD ALIAS '+disk_group_1/my_dir/my_file.dbf'
  FOR '+disk_group_1.342.3';

-- Rename an alias.
ALTER DISKGROUP disk_group_1 RENAME ALIAS '+disk_group_1/my_dir/my_file.dbf'
  TO '+disk_group_1/my_dir/my_file2.dbf';

-- Delete an alias.
ALTER DISKGROUP disk_group_1 DELETE ALIAS '+disk_group_1/my_dir/my_file.dbf';

Files

-- Drop file using an alias.
ALTER DISKGROUP disk_group_1 DROP FILE '+disk_group_1/my_dir/my_file.dbf';

-- Drop file using a numeric form filename.
ALTER DISKGROUP disk_group_1 DROP FILE '+disk_group_1.342.3';

-- Drop file using a fully qualified filename.
ALTER DISKGROUP disk_group_1 DROP FILE '+disk_group_1/mydb/datafile/my_ts.342.3';

Checking metadata

-- Check metadata for a specific file.
ALTER DISKGROUP disk_group_1 CHECK FILE '+disk_group_1/my_dir/my_file.dbf'

-- Check metadata for a specific failure group in the disk group.
ALTER DISKGROUP disk_group_1 CHECK FAILGROUP failure_group_1;

-- Check metadata for a specific disk in the disk group.
ALTER DISKGROUP disk_group_1 CHECK DISK diska1;

-- Check metadata for all disks in the disk group.
ALTER DISKGROUP disk_group_1 CHECK ALL;

Change compatible attribute for a diskgroup

alter diskgroup DG_ASM1POC_DT_01 set attribute 'compatible.rdbms'='10.2.0.5'; This parameter cannot be lowered.

Start/stop diskgroups

srvctl start diskgroup -g DG_ASM1POC_DT_01 -n lnxdb-svl-02,lnxdb-svl-03,lnxdb-svl-04

srvctl stop diskgroup -g DG_ASM1POC_DT_01 -n lnxdb-svl-02,lnxdb-svl-03,lnxdb-svl-04

How to list the diskgroups in ASM instance?

sqlplus / as sysasm
select name, state from v$asm_diskgroup;
or
asmcmd lsdg or 
asmcmd ls

ASM Views

ViewASM InstanceDB Instance
V$ASM_ALIASDisplays a row for each alias present in every disk group mounted by the ASM instance.Returns no rows
V$ASM_CLIENTDisplays a row for each database instance using a disk group managed by the ASM instance.Displays a row for the ASM instance if the database has open ASM files.
V$ASM_DISKDisplays a row for each disk discovered by the ASM instance, including disks which are not part of any disk group.Displays a row for each disk in disk groups in use by the database instance.
V$ASM_DISKGROUPDisplays a row for each disk group discovered by the ASM instance.Displays a row for each disk group mounted by the local ASM instance.
V$ASM_FILEDisplays a row for each file for each disk group mounted by the ASM instance.Displays no rows.
V$ASM_OPERATIONDisplays a row for each file for each long running operation executing in the ASM instance.Displays no rows.
V$ASM_TEMPLATEDisplays a row for each template present in each disk group mounted by the ASM instance.Displays a row for each template present in each disk group mounted by the ASM instance with which the database instance communicates.

ASM Background processes

1. ARBn - ASM Rebalance Process , Rebalances data extents within an ASM disk group
2. ASMB - ASM Background Process. Communicates with the ASM instance, managing storage and providing statistics
3. GMON - ASM Disk Group Monitor Process. Monitors all mounted ASM disk groups
4. ABMR - Auto BMR Background Process. Coordinates execution of tasks such as filtering duplicate block media recovery requests and performing flood control.
5. ACFS - ASM Cluster File System CSS Process. Tracks the cluster membership in CSS and informs the file system driver of membership changes.
6. Bnnn - ASM Blocking Slave Process for GMON. Performs maintenance actions on ASM disk groups 
7. CTWR - Change Tracking Writer Process. Tracks the cluster membership in CSS and informs the file system driver of membership changes 
8. LMON - Global Enqueue Service Monitor Process. Monitors an Oracle RAC cluster to manage global resources 
9. LMSn - Global Cache Service Process. Manages resources and provides resource control among Oracle RAC instances 
10. RMSn - Oracle RAC Management Process. Performs manageability tasks for Oracle RAC

Reference : oracle-base.com

Wednesday, November 30, 2011

Oracle 10g Dataguard Best Practice and setup steps


How it works:

As the primary database processes transactions, the ARCH process on the primary database is configured to transmit the redo data to the standby.  On standby, one or more RFS processes are used to receive redo data and MRP process applies the redo data to the standby.  The primary database also has the Fetch Archive Log (FAL) process to provide a client-server mechanism for transmitting archived logs to the standby following a communication loss between the primary and standby for automatic gap resolution and resynchronization.

Configuration Steps:

This section provides step-by-step instructions on how to setup 10g Dataguard.  Additional information has been provided as notes to elaborate or clarify a point. All steps shown were tested on linux.

Primary host   : prod-lnx-01
Standby host   : stdby-linx-01
ORACLE_SID=SILVER
Kernel   :Linux x86 2.4.21-27.EL (CEL 5)
Service names : SILVER_primary, SILVER_stdby

Initial Setup:

Initialization Parameters:

Primary database init.ora:

instance_name = SILVER
DB_UNIQUE_NAME  = 'SILVER_primary'
_LOG_ARCHIVE_CALLOUT='LOCAL_FIRST=TRUE'
##COMMON TO BOTH PRIMARY AND STANDBY ROLES
log_archive_config ='DG_CONFIG=(SILVER_primary, SILVER_stdby)'
log_archive_dest_1='LOCATION=/oracle/archive/SILVER/SILVER.arch VALID_FOR=(ALL_LOGFILES, ALL_ROLES) DB_UNIQUE_NAME=SILVER_primary'
log_archive_dest_2='SERVICE=SILVER_stdby ARCH VALID_FOR=(ONLINE_LOGFILES, PRIMARY_ROLE) DB_UNIQUE_NAME=SILVER_stdby max_connections=4 delay=30'
log_archive_dest_state_1=enable
log_archive_dest_state_2=enable
log_archive_max_processes=20
log_archive_format='%t_%s_%r.dbf'
remote_login_passwordfile=EXCLUSIVE
#SPECIFIC TO STANDBY ROLE
FAL_CLIENT=SILVER_primary
FAL_SERVER=SILVER_stdby
standby_archive_dest=/oracle/archive/SILVER/SILVER.arch
standby_file_management=auto

NOTE: Values for log_archive_max_processes, max_connections and delay are just recommended values and can be changed as applicable to the env based on the amount of generated redo. You can refer to the test cases to get some idea on what the values should be.

Standby database init.ora:
instance_name = SILVER
DB_UNIQUE_NAME   = 'SILVER_stdby'
log_archive_config ='DG_CONFIG=(SILVER_primary, SILVER_stdby)'
log_archive_dest_1='LOCATION=/oracle/archive/SILVER/SILVER.arch VALID_FOR=(ALL_LOGFILES, ALL_ROLES) DB_UNIQUE_NAME=SILVER_stdby'
log_archive_dest_2='SERVICE=SILVER_primary VALID_FOR=(ONLINE_LOGFILES, PRIMARY_ROLE) DB_UNIQUE_NAME=SILVER_primary max_connections=4 delay=30'
log_archive_dest_state_1=enable
log_archive_dest_state_2=enable
log_archive_max_processes=20
log_archive_format='%t_%s_%r.dbf'
remote_login_passwordfile=EXCLUSIVE
#SPECIFIC TO STANDBY ROLE
FAL_CLIENT='SILVER_stdby'
FAL_SERVER='SILVER_primary'
standby_archive_dest='/oracle/archive/SILVER/SILVER.arch'
standby_file_management='auto'
# SPECIFIC TO RECOVERY
parallel_max_servers=16
parallel_execution_message_size=16384
recovery_parallelism=4

Note:
Create just one initialization parameter file that contains parameters used in both Roles (primary / standby). Parameters specific to that role will be used eg: FAL_ parameter will be used only when the database is in standby role. For Log_archive_dest_n the VALID_FOR attribute will differentiate the roles, if not specified the default is (ALL_LOGFILES,ALL_ROLES). This VALID_FOR attribute allows us to use the same initialization parameter file for both the primary and standby roles. This will allow to failover without any changes

Note:
- The parameters specific to recovery should be set only on standby database and  they enhance the performance of the recovery. These specific parameters are not recommended on primary.
- Max_connection setting has issue. Refer Issues mentioned at the start of the document
- Settings like Log_archive_max_processes, delay can vary based on the env needs

Configure Net Services:

Note:

The recommendation is to use ports between 1910 to 1920 for Data Guard traffic for DG listener as there is a requirement  for asynchronous traffic over WAN to be marked for Scavenger class and these ports are included in scavenger class Qos list.

What is Scavenger class?
Scavenger class traffic is defined as limited percent of the total bandwidth available. When there is available bandwidth the scavenger class will exceed its  allocation and is in no way policed or shaped. The Qos policies will kick in only when there is no available bandwidth, and in that scenario the traffic will be limited to that allocation (which isn't often).  What it means is during the periods of congestion, the Scavenger class policies get kicked in and the traffic marked for this class will get limited bandwidth, packets might get dropped etc..prior to impacting the critical transactional data

Verify the TCP send/receive size are set to 4665000 (for improved efficiency in log shipping).
cat /proc/sys/net/core/wmem_max
cat /proc/sys/net/core/rmem_max
Add SDU = 32768 in tnsnames.ora  in both Primary and DR.
Setup separate listener for DG
 
On Primary database host:
/etc/listener.ora
LISTENER_SILVER_DG =
  (DESCRIPTION_LIST =
    (DESCRIPTION =
      (ADDRESS_LIST =
        (ADDRESS = (PROTOCOL = TCP)(HOST =erpdb-prd-06)(PORT = 1523))
      )
    )
  )
SID_LIST_LISTENER_SILVER_DG =
  (SID_LIST =
    (SID_DESC =
      (SDU=32768)
      (SID_NAME = SILVER)
      (ORACLE_HOME = /oracle/product/10.2.0.2-64)
    )
  )

/etc/tnsnames.ora
SILVER_stdby =
 (DESCRIPTION =
  (SDU = 32768)
   (ADDRESS_LIST =
       (ADDRESS =
         (PROTOCOL = TCP)
         (HOST =hpquadopt)
         (PORT = 1523)
        )
    )
   (CONNECT_DATA =
     (SERVICE_NAME = SILVER)
   )
)
On standby host:
/etc/listener.ora
LISTENER_SILVER_DG =
  (DESCRIPTION_LIST =
    (DESCRIPTION =
      (ADDRESS_LIST =
        (ADDRESS = (PROTOCOL = TCP)(HOST =hpquadopt)(PORT = 1523))
      )
    )
  )
SID_LIST_LISTENER_SILVER_DG =
  (SID_LIST =
    (SID_DESC =
      (SDU=32768)
      (SID_NAME = SILVER)
      (ORACLE_HOME = /oracle/product/10.2.0.2-64)
    )
  )
SILVER_primary =
 (DESCRIPTION =
  (SDU = 32768)
   (ADDRESS_LIST =
       (ADDRESS =
         (COMMUNITY = portal.com)
         (PROTOCOL = TCP)
         (HOST =erpdb-prd-06)
         (PORT = 1523)
        )
    )
   (CONNECT_DATA =
     (SERVICE_NAME = SILVER)
   )
)

Configure Primary Database

Ensure initialization parameters and net services configuration in place (refer initial setup)
Shutdown the Database
Setup Remote OS authentication
Create the password file if not in place already
orapwd file=/oracle/admin/<SID>/pfile/orapw<SID> password=<sys password>
Ensure sym link is created from $ORACLE_HOME/dbs to /oracle/admin/<SID>/pfile/orapw<SID>
Copy the orapw<sid> from primary to same location on standby
Ensure the Database is in archivelog mode
Startup the Database

Configure Standby Database

1. Ensure initialization parameters and net services configuration in place (refer initial setup)
2. Add entry in /etc/oratab. Put automatic startup as N
3. Copy the datafiles and required archives from cold/hot backup to DR server
4. Create the standby controlfile on Primary host
SQL>ALTER DATABASE CREATE STANDBY CONTROFLE AS '/tmp/stdby.ctl';
Copy the stdby.ctl file to the standby host. Make sure the control_file parameter reflects the correct name/path
Startup the standby database
SQL>STARTUP MOUNT
(optional) Create the SRL's (standby redo logs). Number of SRL’s should be one more than the number of redo logs on primary and the log size should be same as primary
                SQL>ALTER DATABASE ADD STANDBY LOGFILE GROUP 4 size 50 M;
                                 
                SQL>ALTER DATABASE ADD STANDBY LOGFILE GROUP 5 size 50 M;
                 
                SQL>ALTER DATABASE ADD STANDBY LOGFILE GROUP 6 size 50 M;

Note:

The archiver (ARCn) process on the primary database can optionally transmit redo data to remote standby redo logs (SRL’s) if  SRL’s are created.  In a failover situation, you will have access to the information already written in the Standby Redo Logs rather than wait until it is archived completely in case of no SRL’s and hence reducing the risk of loosing data.
MAXLOGFILE defaults to 16 , To create online redologs + standby redologs more than this ensure that you recreate the control file to modify maxlogfile to accomodate this number.

The POC testing was done with and without SRL’s. No issues were noticed with either option. But, if you can not afford to loose any data in case of a failover and you need standby recovered real time, you have to use SRL’s

Verify log shipping

Check to see if the redo from the primary is being shipped to the standby    
            On the primary do the following:
            SQL>ALTER SYSTEM SWITCH LOGFILE;
            SQl>SELECT SEQUENCE#, FIRST_TIME, NEXT_TIME, ARCHIVED, DEST_ID  FROM V$ARCHIVED_LOG ORDER BY SEQUENCE#;

            SEQUENCE# FIRST_TIME  NEXT_TIME   ARC    DEST_ID
      ---------- ----------- ----------- --- ----------
      1243 01-OCT-2006 07-OCT-2006 YES          1
      1243 01-OCT-2006 07-OCT-2006 YES          2
      1244 01-OCT-2006 07-OCT-2006 YES          1
      1244 01-OCT-2006 07-OCT-2006 YES          2

Note

In this configuration, arch process is used for log_archive_dest_2 and SRL’s are created on the standby. On the primary database, after the ARC0 process successfully archives the local online redo log to the local destination (LOG_ARCHIVE_DEST_1), the ARC1 process transmits redo from the local archived redo log files (instead of the online redo log files) to the remote standby destination (LOG_ARCHIVE_DEST_2). On the remote destination, the remote file server process (RFS) will in turn write the redo data to an archived redo log file from a standby redo log file.

Verify log apply

Start managed recovery
SQL>ALTER DATABASE RECOVER MANAGED STANDBY DATABASE DISCONNECT;
Verify if the archived logs are applied successfully on the standby
SQL>SELECT SEQUENCE#,APPLIED FROM V$ARCHIVED_LOG ORDER BY SEQUENCE#;

Note:

In our setup, the log apply services on standby are delayed by 90 mins. If we need real time apply enabled, the log apply services can apply redo data as it is received, without waiting for the current standby redo log file to be archived. On the standby cancel out of the current managed recovery and place it back in recovery with Real Time Apply
SQL>ALTER DATABASER RECOVER MANAGED STANDBY DATABASE CANCEL;    
SQL>ALTER DATABASE RECOVER MANAGED STANDBY DATABASE USING CURRENT LOGFILE DISCONNECT;


Thursday, July 21, 2011

Detailed and simple steps for Schema Migration using exp/imp,pipe,gz between two databases

Detailed and simple steps for Schema Migration using exp/imp,pipe,gz between two databases

Start of Migration

On the Source Database
==================
SQL> select name,open_mode from v$database;

NAME      OPEN_MODE
--------- ----------
SOURCE    READ WRITE

1. SQL> select owner,sum(bytes)/1024/1024 from dba_segments where owner in ('SCHEMA1','SCHEMA2','SCHEMA3','SCHEMA4','SCHEMA5') group by owner;

2. SQL> select tablespace_name,sum(bytes)/1024/1024 from dba_segments where owner in ('SCHEMA1','SCHEMA2','SCHEMA3','SCHEMA4','SCHEMA5') group by tablespace_name;

3. SQL> select default_tablespace,username from dba_users where username in ('SCHEMA1','SCHEMA2','SCHEMA3','SCHEMA4','SCHEMA5');

4. SQL> select owner,status,object_type,count(*) from dba_objects where owner in ('SCHEMA1','SCHEMA2','SCHEMA3','SCHEMA4','SCHEMA5') group by object_type,owner,status;

5. SQL> select object_type,count(*) from dba_objects where owner in ('SCHEMA1','SCHEMA2','SCHEMA3','SCHEMA4','SCHEMA5') group by object_type;

6. SQL> select count(*),status from dba_objects where owner in ('SCHEMA1','SCHEMA2','SCHEMA3','SCHEMA4','SCHEMA5') group by status;

7. SQL> select object_type,count(*),status from dba_objects where owner in ('SCHEMA1','SCHEMA2','SCHEMA3','SCHEMA4','SCHEMA5') group by status,object_type;

8. SQL> select tablespace_name,sum(bytes)/1024/1024/1000 from dba_data_files  where tablespace_name in('TS1','TS2','TS3','TS4','TS5','TS6','TS7') group by tablespace_name;

9. Export Schemas:
  
   vi exp_SOURCE_schemas.sh

   #!/bin/ksh
   export NLS_LANG=AMERICAN_AMERICA.UTF8
   mknod /tmp/exp_pipe1 p
   gzip -cNf SOURCE_schemas.dmp.gz &
   exp system/sysmic32 file=/tmp/exp_pipe1 buffer=2097152 log=exp_SOURCE_schemas.log statistics=none owner=SCHEMA1,SCHEMA2,SCHEMA3,SCHEMA4,SCHEMA5
   rm -f /tmp/exp_pipe1
   unset NLS_LANG

10. nohup ./exp_SOURCE_schemas.sh > exp_SOURCE_schemas.log 2>&1

11. Copy the SOURCE_schemas.dmp.gz to Target Database server.
    scp -p SOURCE_schemas.dmp.gz ganesh@target_server:/oracle/export


On the Target Database
==================
SQL> select name,open_mode from v$database;

NAME      OPEN_MODE
--------- ----------
TARGET    READ WRITE


1. Create tablespaces as per the output from Step 7 you got on Source database

2. Create users on Target database
   Run the following script on the source database and execute the resultant script on the Target database

   set linesize 300
   set pagesize 300
   spool create_users.sql
   select 'create user '||username||' identified by values '''||password||''' default tablespace '||default_tablespace||' temporary tablespace temp profile '||profile||';' from dba_users where username in ('SCHEMA1','SCHEMA2','SCHEMA3','SCHEMA4','SCHEMA5');
   spool off

3. Grant Quotas on Target database
   Run the following script on the source database and execute the resultant script on the Target database

   spool create_tablespace_quota.sql
   select 'alter user '||username||' quota unlimited on '||tablespace_name||';' from dba_ts_quotas where MAX_BYTES='-1' and username in ('SCHEMA1','SCHEMA2','SCHEMA3','SCHEMA4','SCHEMA5');
   select 'alter user '||username||' quota '||max_bytes||' on '||tablespace_name||';' from dba_ts_quotas where MAX_BYTES!='-1' and username in ('SCHEMA1','SCHEMA2','SCHEMA3','SCHEMA4','SCHEMA5');
   spool off

4. Grant Roles on Target database
   Run the following script on the source database and execute the resultant script on the Target database
   spool create_grant_roles.sql
   select 'grant '||GRANTED_ROLE||' to '||GRANTEE||';' from dba_role_privs where ADMIN_OPTION='NO' and grantee in ('SCHEMA1','SCHEMA2','SCHEMA3','SCHEMA4','SCHEMA5');    
   select 'grant '||GRANTED_ROLE||' to '||GRANTEE||' with admin option;' from dba_role_privs where ADMIN_OPTION='YES' and grantee in ('SCHEMA1','SCHEMA2','SCHEMA3','SCHEMA4','SCHEMA5');
   spool off

5. Grant System privs on Target database
   spool create_sys_privs.sql
   Run the following script on the source database and execute the resultant script on the Target database
   select 'grant '||PRIVILEGE||' to '||GRANTEE||';' from dba_sys_privs where  ADMIN_OPTION='NO' and grantee in ('SCHEMA1','SCHEMA2','SCHEMA3','SCHEMA4','SCHEMA5');
   select 'grant '||PRIVILEGE||' to '||GRANTEE||'  with admin option;' from dba_sys_privs where ADMIN_OPTION='YES' and grantee in ('SCHEMA1','SCHEMA2','SCHEMA3','SCHEMA4','SCHEMA5');
   spool off


6. Import Schemas

   vi imp_TARGET_schemas.sh

   #!/bin/ksh
   export NLS_LANG=AMERICAN_AMERICA.AL32UTF8
   mknod /tmp/imp_pipe1 p
   gunzip -c SOURCE_schemas.dmp.gz >/tmp/imp_pipe1 &
   imp system/manager99 file=/tmp/imp_pipe1  buffer=20971520 log=imp_TARGET_schemas.log full=y
   rm -f /tmp/imp_pipe1
   unset NLS_LANG

7. Verify the logs

8. Do step 1 to step 7 that you have done on the source database.

9.  Grant Table privs on the Target
    Run the following script on the source database and execute the resultant script on the Target database
    spool create_tab_privs.sql
    select 'grant '||privilege||' on '||owner||'.'||table_name||' to '||grantee||';' from dba_tab_privs where GRANTABLE='NO' and grantee in ('SCHEMA1','SCHEMA2','SCHEMA3','SCHEMA4','SCHEMA5');
    select 'grant '||privilege||' on '||owner||'.'||table_name||' to '||grantee||' with grant option;' from dba_tab_privs where GRANTABLE='YES' and grantee in ('SCHEMA1','SCHEMA2','SCHEMA3','SCHEMA4','SCHEMA5');
    spool off


9. EXEC DBMS_UTILITY.COMPILE_SCHEMA ('SCHEMA1'); -> Do for all schemas that you have imported

10. exec dbms_stats.gather_schema_stats('SCHEMA1', cascade=>TRUE); -> Do for all schemas that you have imported

End of Migration

Monday, May 23, 2011

Where are the log files located in R12?

Where are the log files located in R12?

For DBA’s who mostly worked on 11i environments, finding the log files (Concurrent manager log, apache log etc.,) on a R12 environment might pose a threat initially, because these log files no longer reside in their old location ie., $APPLCSF/$APPLLOG or $APACHE_TOP/Apache/logs.
In R12, the log files are located in $LOG_HOME (which translates to $INST_TOP/logs)
Concurrent Reqeust related logs
$LOG_HOME/appl/conc -> location for concurrent requests log and out files
$LOG_HOME/appl/admin -> location for mid tier startup scripts log files
Apache Logs (10.1.3 Oracle Home which is equivalent to iAS Oracle Home)
$LOG_HOME/ora/10.1.3/Apache -> Location for Apache Error and Access log files
$LOG_HOME/ora/10.1.3/j2ee -> location for j2ee related log files
$LOG_HOME/ora/10.1.3/opmn -> location for opmn related log files
Forms & Reports related logs (10.1.2 Oracle home which is equivalent to 806 Oracle Home)
$LOG_HOME/ora/10.1.2/forms
$LOG_HOME/ora/10.1.2/reports
Related metalink notes to enable additional debugging
419839.1 – How to enable Apache, OC4J and OPMN logging in Oracle Applications R12
422419.1 – R12 – How To Enable and Collect Debug for HTTP, OC4J and OPMN

Source : http://oraclepitstop.wordpress.com

Friday, April 29, 2011

How to enable Apache and Jserv Debugging in Oracle Apps 11i?

PURPOSE:-If a user experiences an error, request a screen shot of the error and any further error details that they can report.If the error is reproducible, enable the following middle tier debug settings and collect diagnostic information appropriately and upload to support for troubleshooting.

Looking for Jserv.log at $IAS_ORACLE_HOME/Apache/Jserv/logs then enable…
For Temporary purpose manually editing configuration files.
1) Shut Down Apache Server
2) Backup the existing files in the following files:
$IAS_ORACLE_HOME/Apache/Apache/logs
$IAS_ORACLE_HOME/Apache/Jserv/logs
$IAS_ORACLE_HOME/Apache/Jserv/logs/jvm
3) Enable debug logging for Apache
s_apache_loglevel=debug (In Context File)
Or
loglevel debug (In $IAS_ORACLE_HOME/Apache/Apache/conf/httpd.conf)
4) Enable debug logging for mod_jserv
s_apjservloglevel=debug (In Context File)
Or
ApJServLogLevel debug (In $IAS_ORACLE_HOME/Apache/Jserv/etc/jserv.conf)
5) Enable debug logging for Jserv
s_oacorelog=true (In Context File)
Or
log=true log.channel=true log.channel.info=true log.channel.debug=true
(In $IAS_ORACLE_HOME/Apache/Jserv/etc/jserv.properties)
6) Enable debug logging for Forms Listener Servlet JVM. (Optional)
s_oaformslog=true (In Context File)
Or
log=true log.channel=true log.channel.info=true log.channel.debug=true
(In $IAS_ORACLE_HOME/Apache/Jserv/etc/forms.properties)
7) Restart Apache
(If Context File had been edited in above steps then run autoconfig to update the configuration files.) 8) Replicate the Problem.
9) Review the following files from the $IAS_ORACLE_HOME/Apache/Jserv/logs directory
a) mod_jserv.log
b) jserv.log
c) All files from the $IAS_ORACLE_HOME/Apache/Jserv/logs/jvm directory These will
have filenames of the form jvm.jvm.stdoutstderr For example,
OACoreGroup.0.stderr
d) $COMMON_TOP/rgf/instance_hostname/javacache.log

Source: http://leenus2b.wordpress.com

For R12: How To : How to enable Apache, OC4J and OPMN logging in Oracle Applications R12  use Doc id [ID 419839.1]

Wednesday, March 02, 2011

Forms Servlet mode to Socket mode conversion on Release 12 Apps

How to convert Forms server to Socket mode  from Servlet mode in Oracle Apps R12

Run the following command to enable Forms Socket Mode on Forms/web nodes (Place correct context file name and port value)

$FND_TOP/bin/txkrun.pl -script=ChangeFormsMode -contextfile=$CONTEXT_FILE -mode=socket  -port=9030 -runautoconfig=No


Where port = forms port and contextfile=your environment contextfile

To Start/Stop/check Status of forms servers use following scripts

cd $ADMIN_SCRIPTS_HOME
./adformsrvctl.sh status/stop/start


Friday, October 29, 2010

MSG-00102: Error Message :ORA-20100: File o0000071.tmp creation for FND_FILE failed.

Troubleshooting Details

If a PL/SQL Concurrent Program can't write to an external file, you will receive an error message similar to:

MSG-00102: Error Message :ORA-20100: File o0000071.tmp creation for FND_FILE failed.
You will find more information on the cause of the error in request log.
ORA-06512: at "APPS.FND_FILE", line 378
ORA-06512: at "APPS.FND_FILE", line 473
ORA-06512: at "APPS.AP_TRIAL_BALANCE_PKG", line 192
REP-1419: 'beforereport': PL/SQL program aborted.

NOTE: Applications also produces temporary PL/SQL output files used in concurrent processing. These files are written to a location on the database server node specified by the APPLPTMP environment setting. The APPLPTMP directory must be the same directory as specified by the utl_file_dir parameter in your database initialization file.
.
Rapid Install sets both APPLPTMP and the utl_file_dir parameter to the same default directory. As the temporary files placed in this directory may contain context sensitive information, it should be a secure directory on the database server node with read and write access for the database server owner. In a multi-node system, the directory defined by APPLPTMP does not need to exist on the application tier servers. During an upgrade with AutoUpgrade, you must provide the utl_file_dir parameter value for the APPLPTMP environment setting.


To isolate where the problem is, verify the following:

1) Make sure that the name of the file is valid (the file name should not include characters like "^")

2) Make sure that APPLPTMP is set to a valid directory and that BOTH the applmgr user and the database user have read and write permissions on that directory (normally, it can be set to the same directory as APPLTMP)

3) Make sure that the file does not exit on the directory pointed by APPLPTMP

4) Make sure the directory pointed by APPLPTMP is the first entry on the utl_file_dir. Also, verify that all the entries on the utl_file_dir are valid and that the applmgr has read/write permissions.

If using an spfile, verify the proper syntax to set utl_file_dir:

Eg:  ALTER SYSTEM SET UTL_FILE_DIR='directory1','directory2' scope=spfile;

5) If still having problems, check if you can write a file directly using FND_FILE, which is the package used by the Application. From sqlplus, connected as the apps user, run:

    SQL> exec FND_FILE.PUT_LINE(FND_FILE.LOG, 'THIS IS A TEST');

This should dump a file on APPLPTMP.

If this test works, it would indicate that FND_FILE is ok and the problem is possibly with the Application.

You may want to leave only one entry on utl_file_dir for this test.

6) If still having problems, check if you can write a file using UTL_FILE, which is used by FND_FILE.

Run the PL/SQL below, changing to the first entry on utl_file_dir (you may want to leave just one entry on utl_file_dir for this test).

set serveroutput on
DECLARE
  file_location VARCHAR2(256) := '';
  file_name VARCHAR2(256) := 'utlfile1.lst';
  file_text VARCHAR2(256) := 'THIS IS A TEST';
  file_id UTL_FILE.file_type;
BEGIN
  file_id := UTL_FILE.fopen(file_Location, file_name, 'W');
  UTL_FILE.put_line(file_id, file_text);
  UTL_FILE.fclose(file_id);
EXCEPTION
  WHEN UTL_FILE.INVALID_PATH
  THEN dbms_output.put_line('Invalid path ' || SQLERRM);
    WHEN OTHERS
  THEN dbms_output.put_line('Others '|| SQLCODE || ' ' || SQLERRM);
END;
/

This program should dump a file on the requested directory. If the test fails, the problem is probably on the Database side.

If it works, the problem is probably on FND_FILE. In this scenario, check the versions of AFCPPIOS.pls and AFCPPIOB.pls.


Source : Troubleshooting ORA-20100 on Concurrent Processing [ID 261693.1] (suppot.oracle.com)

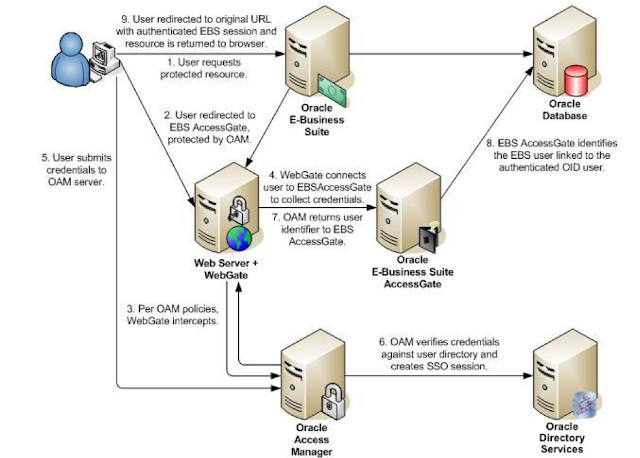
Oracle EBS integration with Oracle IDCS for SSO

Oracle EBS integration with Oracle IDCS for SSO Oracle EBS SSO? Why is it so important? Oracle E-Business Suite is a widely used application...