Oracle EBS integration with Oracle IDCS for SSO
Oracle EBS SSO? Why is it so important?
Oracle E-Business Suite is a widely used application by thousands of customers. Oracle EBS SSO is highly recommended for Improved Oracle EBS Security and delivering a transparent, better user experience. SSO is one of the mandatory requirements for IT Security Audits in Oracle E-Business Suite
- Users don’t have to remember dozens of passwords for Oracle e-Business Suite – 11i, 12.1, and 12.2.
- Weak passwords in Applications are no longer allowed. Welcome123 and Oracle123 are the most popular weak passwords in Oracle EBS
- Access to Oracle EBS is terminated instantly, when an employee/contractor leaves. This is a requirement Audit requirement
- Passwords alone are not secure enough these days, multi-factor authentication is a must have for Oracle EBS today
- Enforce user to change SSO password periodically to follow security guidelines.
- Users don’t have to login multiple times, resulting in a better productivity and better user experience.
- EBS Password reset calls to Helpdesk would be greatly reduced, and Oracle EBS Support teams are relieved.
- IT Security Audits such as SoX, HIPAA demand Single Sign On for Oracle EBS 11i, R12, and 12.2.
- Users don’t have to remember Applications URLs anymore, as URLs change from time to time.
Traditional Approach
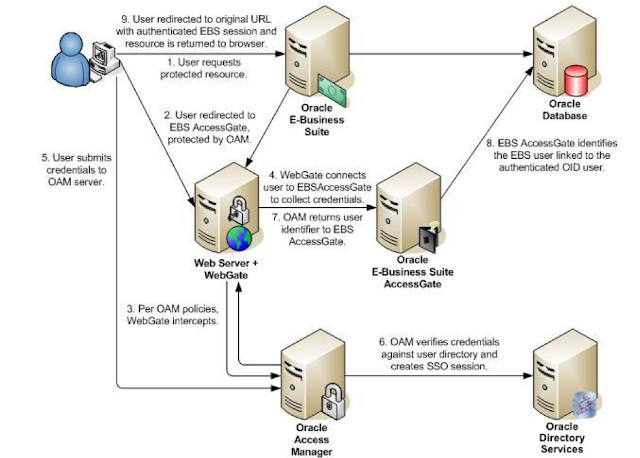
Oracle EBS SSO is traditionally enabled with Oracle Access Manager (OAM) and Oracle Internet Directory (OID) which is what Oracle recommends for EBS SSO. The diagram below shows a summary of this approach as described in 1388152.1Oracle Note.

This is a standard, Oracle certified approach which is complex and involves multiple components. For SSO you need to deploy Access Manager, a Directory (OID), a WebGate, an AccessGate, and integrate each one of these with EBS. Both EBS 11i and 12.x require all these components. Traditional SSO Implementation challenges of procuring SSO software and hardware create longer implementation cycles and run-time issues such as production SSO outages. All these additional components also need to go through the maintenance cycle of patching, upgrading, and more. And not to forget this also requires configuration changes and scripts to be run at EBS level as well. For some customers, this additional complexity has led to not implementing SSO, resulting in the user experience suffering.
What is Oracle IDCS
Oracle Identity Cloud Service provides identity management, single sign-on (SSO), and identity governance for applications on-premise, in the cloud, or for mobile devices. Employees and business partners can access applications at any time, from anywhere, and on any device in a secure manner.


- Non-intrusive solution that doesn't require configuration changes in your Oracle e-Business Suite environment.
- Need to be deployed in WebLogic Server 12c using secure communications (SSL/TLS)
- Multiple access modes for SSO with Oracle e-Business Suite:
- Access Oracle e-Business Suite using the EBS Asserter’s direct URL link (bookmark)
- Access Oracle e-Business Suite using Oracle Identity Cloud Service's My Apps page
- Access Oracle e-Business Suite using the EBS Asserter's login using a redirect parameter
- Access Oracle e-Business Suite using previously bookmarked Oracle EBS URLs
- Supports Oracle e-Business Suite, EBS Asserter, and Oracle Identity Cloud Service Single logout.
- Work with Multiple Oracle E-Business Suite Instances for SSO
- Oracle JRE/JDK version 8
- Java Cryptography Extension
- A separate instance of Oracle WebLogic Server 12c (12.1.3 and 12.2)
- Access to an instance of Oracle EBS Release 11i (11.5.10) or Release 12 (12.1.3, 12.2.4, or greater).
- Access to an instance of Oracle EBS Asserter Release 20.1.3 onwards.
- The feature for EBS Asserter must be enabled.
- Download and extract the EBS Asserter zip file
- Enable EBS Asserter Flag
- Download Oracle JRE/JDK version 8 and install
- Download Java Cryptography Extension and extract
- Download EBS Asserter and extract
- Download Oracle WebLogic Server 12c and install it.
- Create Managed Server called EBSAsserter_server
- Register E-Business Suite Asserter with Oracle E-Business Suite
- Register the E-Business Suite Asserter in Oracle Identity Cloud Service
- Update the Configuration File
- Deploy the E-Business Suite Asserter
- Update Oracle E-Business Suite Profiles
- Test Single Sign-On with Oracle E-Business Suite
Enable EBS Asserter Flag
Open an SR with Oracle to enable EBS Asserter Flag from Oracle side for the Tenant.
Infrastructure setup
Download Oracle JRE/JDK version 8.
Downloaded JDK 8u261 from
https://www.oracle.com/java/technologies/javase/javase-jdk8-downloads.html
[ebsa@lnxxpebsa Softwares]$ ls -ltr jdk-8u261-linux-x64.tar
-rwxrwxrwx. 1 ebsa ebsa 353228800 Aug 29 10:47 jdk-8u261-linux-x64.tar
[ebsa@lnxxpebsa Softwares] tar -xvf jdk-8u261-linux-x64.tar
[ebsa@lnxxpebsa Softwares]$ ls -ld jdk1.8.0_261
drwxr-xr-x. 8 ebsa ebsa 4096 Jun 18 2020 jdk1.8.0_261
[ebsa@lnxxpebsa Softwares]$ cd jdk1.8.0_261/bin
[ebsa@lnxxpebsa bin]$ ./java -version
java version "1.8.0_261"
Java(TM) SE Runtime Environment (build 1.8.0_261-b12)
Java HotSpot(TM) 64-Bit Server VM (build 25.261-b12, mixed mode)
[ebsa@lnxxpebsa bin]$
Download Java Cryptography Extension
https://www.oracle.com/java/technologies/javase-jce8-downloads.html
[ebsa@lnxxpebsa Softwares]$ ls -ltr jce_policy-8.zip
-rwxrwxrwx. 1 1000 1001 12417 Aug 29 10:56 jce_policy-8.zip
[ebsa@lnxxpebsa Softwares]$
- Access the Identity Cloud Service console, expand the Navigation Drawer , click Settings, and then click Downloads. On the Downloads page, click Download to download the Identity Cloud Service E-Business Suite Asserter, and then save the zip file to any folder on your desktop.
- Extract the content of the EBS Asserter zip file on your desktop, and then find the location of the ebs.war and idcs-wallet-<version>.jar files.
- Copy the ebs.war and idcs-wallet-<version>.jar files to a working folder into the EBS Asserter's WebLogic Server machine. For example, /opt/ebssdk (create this folder if it does not exist).


Provide Weblogic Home and click next

Select
Installation Type as “WebLogic Server” and click Next

Click next to continue


Installation is complete
Start the WebLogic Server
cd /u01/Oracle/Middleware/Oracle_Home/user_projects/domains/base_domain/bin
./startWebLogic.sh
Change the protocol from http to https and bounce the Server.
Environment -> Servers -> Admin Sever -> Enable Check box on SSL Listen Port Enabled
Port: 7002


- We are not creating new user in E-Business Suite, we are using existing user ASADMIN.
- Make sure User has Roles UMX|APPS_SCHEMA_CONNECT.
- User is active and reset password.
- Test the user by logging into EBS
cd /home/apps
mkdir ebssdk
cd ebssdk
-bash-4.2$ java oracle.apps.fnd.security.AdminDesktop apps/apps CREATE NODE_NAME=lnxpebsa.linux.com DBC=/test1/inst/apps/TEST1_testlinux/appl/fnd/12.0.0/secure/TEST1.dbc
Application node exists, using server ID of node.
Committing changes
CREATE executed successfully - TEST1_LNXPEBSA.dbc
-bash-4.2$ ls -ltr
total 12313
-rw-r--r-- 1 applmgr dba 470 Sep 17 04:06 Readme
-rw-r--r-- 1 applmgr dba 392 Sep 17 05:44 FileInfo.json
drwxr-xr-x 3 applmgr dba 1 Sep 17 05:45 build
-rw-r--r-- 1 applmgr dba 11262438 Oct 24 19:32 ebsassert-20.1.3-0.2009162026.zip
-rw-r--r-- 1 applmgr dba 420 Oct 24 19:36 TEST1_LNXPEBSA.dbc
3.Register the E-Business Suite Asserter in Oracle Identity Cloud Service
This step is done by Client or who has access to Oracle IDCS Services access.
Create a confidential application in Oracle Identity Cloud Service to represent the E-Business Suite Asserter.
- Sign into Oracle Identity Cloud Service console.
- In the Oracle Identity Cloud Service console, expand the Navigation Drawer , and then click Applications.
- In the Applications page, click Add.
- In the Add Application dialog box, click Confidential Application.
- Enter the following information in the Details pane, and then click Next.
- Name: EBS Asserter
- Description: EBS Asserter Application
- Application URL: https://testlinux.linux.com:7003/ebs
- Display in My Apps: Select this check box.
6. In the Client pane, select Configure this application as a client now, and then enter the following information:
- Allowed Grant Types: Select Client Credentials and Authorization Code.
- Redirect URL: https://lnxpebspa.linux.com:7003/ebs/response
- Logout URL: https://lnxpebspa.linux.com:7003/ebs/logout
- Post Logout Redirect URL: https://lnxpebspa.linux.com:7003/ebs
- In the Client pane, scroll down, click the Add button below Grant the client access to Identity Cloud Service Admin APIs.
- In the Add App Role dialog window, select Authenticator Client and Me in the list, and then click Add.
- Click Next in the Client pane and in the following panes until you reach the last pane. Then click Finish.
- In the Application Added dialog box, make note of the Client ID and Client Secret values,
- ClientID value:
- ClientSecret value:
Click Activate to activate the application.
In the Activate Application? dialog box, click Activate Application.
The success message The EBS Asserter application has been activated. appears.
4.Create a WebLogic Wallet
cd /u01/Softwares/build/libs
cp idcs-wallet-20.1.3-0.2009162026.jar /u01/ebssdk/
/u01/Softwares/jdk1.8.0_261/bin/java -jar idcs-wallet-20.1.3-0.2009162026.jar
[apebsa@lnxpebspa libs]$ /u01/Softwares/jdk1.8.0_261/bin/java -jar idcs-wallet-20.1.3-0.2009162026.jar
Enter Wallet Path:
/u01/Oracle/wallet
Enter Client ID:
***************
Enter Client Secret:
***************
Enter IDCS base URL:
https://idcs-5434044210df33a557f2fd11d583.identity.oraclecloud.com
values saved successfully in wallet.
[apebsa@flnxpebspa libs]$
cd /u01/Softwares/build/libs
unzip ebs.war
cd /u01/Softwares/build/libs/WEB-INF
cp bridge.properties /u01/ebssdk/
cat bridge.properties
=
= Copyright (c) 2018 Oracle and/or its affiliates. All rights reserved.
= SSO Bridge for E-Business Suite
====================================================
= Properties File
app.url=https://lnxpebspa.linux.com:7003/ebs
app.serverid=7992200BD0E0530F01580A34873255057544824080340280480238
ebs.url.homepage=https://testlinux.linux.com:4444/OA_HTML/OA.jsp?OAFunc=OANEWHOMEPAGE
ebs.ds.name=testDS
ebs.user.identifier=sysadmin
idcs.iss.url=https://identity.oraclecloud.com/
idcs.aud.url=https://idcs-5434044210df33a557f2fd11d583.identity.oraclecloud.com/
wallet.path=/u01/Oracle/wallet
whitelist.urls=https://testlinux.linux.com:4444/OA_HTML/RF.jsp,https://testlinux.linux.com:4444/OA_HTML/OA.jsp,https://testlinux.linux.com:4444/OA_HTML/BneApplicationService,https://testlinux.linux.com:4444/OA_HTML/jsp/fnd/close.jsp
ebs.renew.session=true
post.logout.url=https://testlinux.linux.com:4444/OA_HTML/OA.jsp?OAFunc=OANEWHOMEPAGE
proxy.mode=false
proxy.home.url=https://testlinux.linux.com:4444/OA_HTML/RF.jsp?function_id=1031198&resp_id=-1&resp_appl_id=0&security_group_id=0&lang_code=US
===================================================
Rebuild ebs.war file again.
cd /u01/Softwares/build/libs/WEB-INF
mv bridge.properties bridge.properties.orig
cp /u01/ebssdk/bridge.properties .
cd /u01/Softwares/build/libs
mv ebs.war ebs.war.orig
/u01/Softwares/jdk1.8.0_261/bin/jar -cvf ebs.war META-INF WEB-INF
Configure Hostname Verification in WebLogic Console
You can configure the hostname verification in Oracle WebLogic Server Administration Console.
Start the Oracle WebLogic Server Administration Console by https://lnxpebspa.linux.com:7002/console
Log in to WebLogic console as an administrator.
In the left panel, click Lock & Edit, expand Environment, select Servers.
Click the name of the target server where you want to deploy the EBS Asserter. In this example, EBSAsserterServer.
Click the SSL tab. Scroll down and expand the Advanced section.
Update the Hostname Verification parameter with the value None, and then click Save.
Click Activate Changes.
Restart the servers.
- Log in as an administrator to the WebLogic console, in this example https://lnxpebspa.linux.com:7002/console
- Expand Services and select Data Sources.
- Click New and select Generic Data Source
- Enter the values as appropriated, and then click Next:
- Name: testDS
- JNDI Name: testDS
- Database Type: Oracle
- The value of the Name parameter must match the ebs.ds.name parameter in the EBS Asserter's configuration file.
- Select the following database driver, and then click Next:
- Database Driver: *Oracle's Driver (Thin) for Instance connections; Versions:Any.
- Note: If you are using an XA data source, select *Oracle's Driver (Thin XA) for Instance connections; Versions:any as Database Driver.
- For a non-XA data source, uncheck the Supports Global Transactions check box. For an XA data source, leave the check box checked. Click Next.
- Enter the following EBS database connection parameters, and then click Next:
- Database Name: TEST1
- Host Name: testlinux.linux.com
- Port: 1521
- Database Username: asadmin
- Password: ****
- In the Driver Class Name : oracle.apps.fnd.ext.jdbc.datasource.AppsDataSource
- In the Properties text box, keep the current value for user, add a new line, and enter the path to the dbc file as per the example below:
- Properties:
- dbcFile=/test1/inst/apps/TEST1_testlinux/appl/fnd/12.0.0/secure/TEST1.dbc
- user=asadmin
- Click Test Configuration.
- If successful, click Next. If an error appears, contact your administrator.
- Note: Make sure your network does not block communication between the EBS Asserter's WebLogic server machine and the Oracle E-Business Suite Database through port number 1521.
- Under Select Targets, select the target server. In this example, EBSAsserter_server.
- Click Finish, and then click Activate Changes

General
Section

Connection
Pool section

Targets Section
Deploy EBS Asserter on WebLogic Server
- Deploy EBS Asserter on WebLogic Server
- Copy the EBS Asserter war file (ebs.war) to the working folder in the WebLogic Server /opt/ebssdk.
- cd /01/Softwares/build/libs
- cp ebs.war /u01/ebssdk
- Log in as an administrator to the WebLogic console, https://lnxpebspa.linux.com:7002/console
- In the left panel, click Lock & Edit.
- Click Deployments and then click Install.
- Enter the path for the EBS Asserter war file as /opt/ebssdk
- Select the ebs.war file and click Next to continue.
- Select Install this deployment as an application, and then click Next.
- Select the target server. In this example, EBSAsserter_server. Then click Next.
- Accept the default values and click Finish.
- Click Activate Changes.

Functional Administrator -> Core Services -> Profiles > Code
APPS_AUTH_AGENT (Application Authenticate Agent) -https://lnxpebspa.linux.com:7003/ebs
APPS_SSO (Applications SSO Type) - SSWA w/SSO
Note: If the update button is disabled, Click on Profile option name -> Set User Access Level -> Updatable check box and click on Update
9.Test Single Sign-On with Oracle E-Business Suite
https://lnxpebspa.linux.com:7003/ebs
You should get IDCS login page.
https://testlinux.linux.com:4444/OA_HTML/AppsLogin
You should get IDCS login page. Make sure SSO re-direction works.
https://lnxpebspa.linux.com:7003/ebs/validate
You should get Success message.
https://lnxpebspa.linux.com:7003/ebs/ebs/about
You should get EBSAsserter Information.