About:
Automatic workload repository is a collection of persistent system performance statistics owned by SYS.
It resides in SYSAUX tablespace. By default snapshot are generated once every 60min and maintained for 7 days by default.
you can generate AWR reports by running SQL scripts:
1)The awrrpt.sql SQL script generates an HTML or text report that displays
statistics for a range of snapshot Ids.
2)The awrrpti.sql SQL script generates an HTML or text report that displays
statistics for a range of snapshot Ids on a specified database and instance.
3) The awrsqrpt.sql SQL script generates an HTML or text report that displays
statistics of a particular SQL statement for a range of snapshot Ids. Run this report
to inspect or debug the performance of a SQL statement.
4) The awrsqrpi.sql SQL script generates an HTML or text report that displays
statistics of a particular SQL statement for a range of snapshot Ids on a specified SQL.
5) The awrddrpt.sql SQL script generates an HTML or text report that compares
detailed performance attributes and configuration settings between two selected
time periods.
6) The awrddrpi.sql SQL script generates an HTML or text report that compares
detailed performance attributes and configuration settings between two selected
time periods on a specific database and instance.
Script Location: $ORACLE_HOME/rdbms/admin
To generate an HTML or text report for a range of snapshot Ids, run the awrrpt.sql
script at the SQL prompt:
Few Views which helps while generating the AWR report
DBA_HIST_SNAPSHOT
DBA_HIST_WR_CONTROL
DBA_HIST_BASELINE
How to Modify the AWR SNAP SHOT SETTINGS:
=====================================
BEGIN
DBMS_WORKLOAD_REPOSITORY.modify_snapshot_settings(
retention => 43200, -- Minutes (= 30 Days). Current value retained if NULL.
interval => 30); -- Minutes. Current value retained if NULL.
END;
/
Creating the Baseline:
======================
BEGIN
DBMS_WORKLOAD_REPOSITORY.create_baseline (
start_snap_id => 10,
end_snap_id => 100,
baseline_name => 'AWR First baseline');
END;
/
Dropping the AWR baseline:
==========================
BEGIN
DBMS_WORKLOAD_REPOSITORY.drop_snapshot_range(
(row_snap_id=>40,
High_snap_id=>80);
END;
/
Creating SNAPSHOT Manually:
===========================
BEGIN
DBMS_WORKLOAD_REPOSITORY.create_snapshot();
END;
/
Workload Repository Views:
==========================
The following workload repository views are available:
* V$ACTIVE_SESSION_HISTORY - Displays the active session history (ASH) sampled every second.
* V$METRIC - Displays metric information.
* V$METRICNAME - Displays the metrics associated with each metric group.
* V$METRIC_HISTORY - Displays historical metrics.
* V$METRICGROUP - Displays all metrics groups.
* DBA_HIST_ACTIVE_SESS_HISTORY - Displays the history contents of the active session history.
* DBA_HIST_BASELINE - Displays baseline information.
* DBA_HIST_DATABASE_INSTANCE - Displays database environment information.
* DBA_HIST_SNAPSHOT - Displays snapshot information.
* DBA_HIST_SQL_PLAN - Displays SQL execution plans.
* DBA_HIST_WR_CONTROL - Displays AWR settings.
Saturday, February 21, 2009
Monday, February 16, 2009
Export / Import a table to zipped dump file using mknode
Export a table to zipped dump file using mknode
export scripts
================
1. Make a piped node
2. Gzip the file using gzip and in background
3. Export the file using exp
export NLS_LANG=AMERICAN_AMERICA.UTF8
mknod mknod_tmp p
gzip < mknod_tmp > exp_CMKT.dmp.gz &
exp file=mknod_tmp buffer=209715200 log=exp_CMKT.log direct=y statistics=none parfile=schema_list.par
export scripts
================
1. Make a piped node
2. Gunzip the file using gunzip and in background
3. Create user and grant necessary permission to the users
4. Check for enough space both data and index
5. Import the file using exp
Import a table to zipped dump file using mknode
import scripts
======================
export NLS_LANG=AMERICAN_AMERICA.UTF8
mknod cmkt_node p
gunzip < exp_CMKT.dmp.gz > cmkt_node &
imp file=cmkt_node buffer=209715200 log=imp_cmkt.log ignore=y destroy=n parfile=cmkt_imp_par.par commit=y
export scripts
================
1. Make a piped node
2. Gzip the file using gzip and in background
3. Export the file using exp
export NLS_LANG=AMERICAN_AMERICA.UTF8
mknod mknod_tmp p
gzip < mknod_tmp > exp_CMKT.dmp.gz &
exp file=mknod_tmp buffer=209715200 log=exp_CMKT.log direct=y statistics=none parfile=schema_list.par
export scripts
================
1. Make a piped node
2. Gunzip the file using gunzip and in background
3. Create user and grant necessary permission to the users
4. Check for enough space both data and index
5. Import the file using exp
Import a table to zipped dump file using mknode
import scripts
======================
export NLS_LANG=AMERICAN_AMERICA.UTF8
mknod cmkt_node p
gunzip < exp_CMKT.dmp.gz > cmkt_node &
imp file=cmkt_node buffer=209715200 log=imp_cmkt.log ignore=y destroy=n parfile=cmkt_imp_par.par commit=y
Tuesday, February 03, 2009
How to Export and Import Statistics
How to Export and Import Statistics of tables?
procedure with a scenerio
Case Definition
A critical application suddenly seems to hang, wait events show long table scans running on the OLTP environment. It comes out that the DBA in charge of this system did run statistics on the tables of the user that owns the application. The gather statistics got stuck and the process was killed. Since this moment the application started to perform extremely slowly.
The production database has several clones; we decide to export back statistics from one of these clones, to the production database.
Steps in Brief
1) Create a table to hold statistics on the source database
2) Generate a script that export table statistics on the clone database
3) Generate a script that import statistics on the clone database
4) Export statistics on clone database
5) Export table containing the exported statistics from clone database
6) Ftp export file with clone statistics table, and the script to import statistics from clone server to production server
7) Import table containing clone statistics into production database
8) Import statistics on production server using the script to import statisctics generated on the clone server
1. Create tables to hold statistics on the clone database
-- On Clone Database
SQL> execute DBMS_STATS.create_stat_table('INV','OLD_STATS');
PL/SQL procedure successfully completed.
SQL> grant SELECT,INSERT,UPDATE,DELETE on INV.OLD_STATS to public;
Grant succeeded.
2. Generate a script that export table statistics on the clone database
The purpose of this script is to generate one export statistics command per table, the export is directed into the table created on step 1.
Variables:
&tabname = the table created on the previous step to hold the statistics
&usrname = The name of the owner of &tabname
---- script to generate export table stats start here ----------
set linesize 130 pagesize 0
spool expstat.sql
select 'exec dbms_stats.export_table_stats('||chr(39)||owner||chr(39)||','||chr(39)||table_name||chr(39)||',null,'||chr(39)||'&tabname'
||chr(39)||',null,true,'||chr(39)||'INV'||chr(39)||')'
from dba_tables where owner ='&usrname'
/
spool off
---- script to generate export table stats end here ----------
Note: you may also use instead of the script this command:
exec DBMS_STATS.export_schema_stats('&usrname','&tabname')
This syntax will run in 10g. It may fail on 8i – 9i databases with some objects. That’s why I prefer the script on these versions.
3. Generate a script that import statistics on the clone database
The purpose of this script is to generate one import statistics command per table, the source is the table created on step 1.
&tabname = the table created on the previous step to hold the statistics
&usrname = The name of the owner of &tabname
---- script to generate import table stats start here ----------
set linesize 130 pagesize 0
spool impstats.sql
select 'exec dbms_stats.import_table_stats('||chr(39)||owner||chr(39)||','||chr(39)||table_name||chr(39)||',null,'||chr(
39)||'&tabname'||chr(39)||',null,true,'||chr(39)||'&usrname'||chr(39)||')'
from dba_tables where owner ='&usrname'
/
spool off
---- script to generate import table stats end here ----------
Execute this script to generate impstats.sql that will import the statistics on the production database.
4. Export statistics on clone database
Using the script expstat.sql; generated on step 2, export statistics into the statistics table created on step 1.
5. Export table containing the exported statistics from clone database
vmractest:/oradisk/av/expstats>exp avargas file=exp_stats_from_clone tables=avr.old_stats feedback=1000
Export: Release 9.2.0.5.0 - Production on Tue Feb 20 11:57:02 2007
Copyright (c) 1982, 2002, Oracle Corporation. All rights reserved.
Password:
Connected to: Oracle9i Enterprise Edition Release 9.2.0.5.0 - Production
With the Partitioning, OLAP and Oracle Data Mining options
JServer Release 9.2.0.5.0 - Production
Export done in IW8ISO8859P8 character set and AL16UTF16 NCHAR character set
About to export specified tables via Conventional Path ...
Current user changed to AVR
. . exporting table OLD_STATS
....
4115 rows exported
Export terminated successfully without warnings.
6. Ftp export file with clone statistics table from clone server to production server and script to import statistics from clone server to production server
Execute FTP session from target server, get both the table that contains the exported statistics and the script to import them, generated on step :
proddb > ftp vmractest
Connected to vmractest
220 vmractest FTP server (SunOS 5.8) ready.
Name (vmractest:oracle): oracle
331 Password required for oracle.
Password:
230 User oracle logged in.
ftp> cd /oradisk/av/expstats
250 CWD command successful.
ftp> get exp_stats_from_clone.dmp
200 PORT command successful.
150 ASCII data connection for exp_stats_from_clone.dmp (10.5.180.72,64082) (473088 bytes).
226 ASCII Transfer complete.
local: exp_stats_from_clone.dmp remote: exp_stats_from_clone.dmp
478390 bytes received in 0.17 seconds (2680.69 Kbytes/s)
ftp> get impstats.sql
200 PORT command successful.
150 ASCII data connection for impstats.sql (10.5.180.72,64776) (31461 bytes).
226 ASCII Transfer complete.
local: impstats.sql remote: impstats.sql
31704 bytes received in 0.033 seconds (947.63 Kbytes/s)
ftp> bye
221 Goodbye.
7. Import table containing clone statistics into production database
On the production database import the table that contains the exported statistics.
proddb >imp avargas file= exp_stats_from_clone.dmp full =y
Import: Release 9.2.0.5.0 - Production on Tue Feb 20 12:19:11 2007
Copyright (c) 1982, 2002, Oracle Corporation. All rights reserved.
Password:
Connected to: Oracle9i Enterprise Edition Release 9.2.0.5.0 - Production
With the Partitioning, OLAP and Oracle Data Mining options
JServer Release 9.2.0.5.0 - Production
Export file created by EXPORT:V09.02.00 via conventional path
import done in UTF8 character set and UTF8 NCHAR character set
export client uses IW8ISO8859P8 character set (possible charset conversion)
export server uses AL16UTF16 NCHAR character set (possible ncharset conversion)
. importing AVARGAS's objects into AVARGAS
. importing AVR's objects into AVR
. . importing table "OLD_STATS" 4115 rows imported
Import terminated successfully without warnings.
8. Import statistics on production server using the script to import statistics generated on the clone server
Using the script impstats.sql; generated on step 3, import statistics into the production database.
Subscribe to:
Posts (Atom)
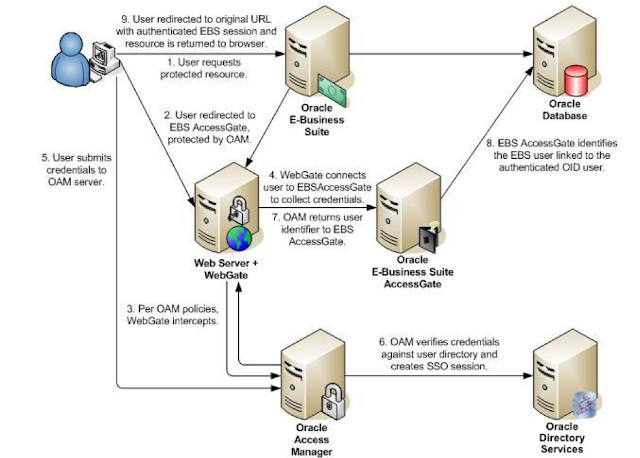
Oracle EBS integration with Oracle IDCS for SSO
Oracle EBS integration with Oracle IDCS for SSO Oracle EBS SSO? Why is it so important? Oracle E-Business Suite is a widely used application...
-
 Enabling TLS in Oracle Apps R12.2 Here we would be looking at the detailed steps for Enabling TLS in Oracle Apps R12.2 Introduction: ...
 -
R12.2. Services Start and Stop Procedure All components - Application (Middle Tier) START $INST_TOP/admin/scripts adstrtal.s...
-
Apps password change routine in Release 12.2 E-Business Suite changed a little bit. We have now extra options to change password, as well ...